
Replacing a toilet seat may not be the most appealing task to many; mostly because people find it gross or they are simply misguided into believing that this is a hard task. But truth be told, this couldn’t be any simpler.
So, whether you are on the job because you have an old toilet seat, a shaky one, damaged one or you are simply looking to re-decorate your toilet space; this is an easy D.I.Y project that will only take up a few tools to get done!
Here is a simple straightforward guideline you will live to use.
You will need the following tools to handle this project:
- Tape measure
- Rubber gloves
- Adjustable wrench or pliers
- A flathead screwdriver
- Spray oil such as WD-40
If you don’t have any of these tools, you can easily find them at the local hardware store.
STEP 1: Measure Your Old Toilet Seat
You want to make sure that you get the same exact dimensions in order to avoid purchasing a seat cover that will not fit your toilet bowl.
Although most toilet seats are standard-sized, you may want to go the extra mile just to be sure.
With the use of the tape measure, measure the distance between the bolt holes of the toilet bowl and be sure to record the length. You will then check this against the measurements of the replacement seat.
STEP 2: Choose a Seat Style and Color
Your local store should have a variety of toilet seat styles and colors from different brands.
At the very core, you want to make sure that your new seat style matches that of your old one. Seat styles can be either rounded or elongated depending on the style of the toilet bowl. Today, you can also find square shaped toilets so be sure that the seat matches the bowl.
Other than the style, the price range also varies. You can find a perfect toilet seat for as low as $20 - $30 or go to the higher end of the price spectrum if you have specific preferences.
Next, you also want to consider a corresponding seat color. Most toilet bowls come in white but you can also find unique colors such as black toilets or contrasting colors and designs such as wooden covers.
Choose accordingly and head home.
STEP 3: Set Out Necessary Tools
You will begin by setting out the aforementioned tools in order to make your work easier.
Because toilets are breeding ground for harmful bacteria, opt to put on your rubber gloves rather than using your bare hands.
Additionally, consider cleaning the toilet bowl and seat before extraction in order to avoid contact with these harmful germs.
STEP 4: Remove the Old Toilet Seat
To remove the toilet seat, you will start by unscrewing the bolts that hold the seat in place. They are located near the tank at the back of the toilet.
Start from the bottom then work your way to the top.
If your seat has bolt caps, you will notice plastic caps at the edge of the seat; located on either side of the bowl. Gently slide the screwdriver under the caps and pull them off; one by one.
Alternatively, if there are no bolt caps, the seat will just have bolts attaching hinges to the toilet bowl. The bolts go through the porcelain and are held in place by nuts.
To remove the bolts, place the adjustable wrench underneath the nuts and rotate the wrench in an anticlockwise direction to loosen the nuts.
Now that you are done with the hinges located at the bottom, remove the bolts at the hinges on top of the bowl.
Note that you will have to use a screwdriver to extract the bolts if they have slotted heads. Continue rotating the nuts and washers; if any, until they fall off. Remember to do so in anticlockwise direction.
At this point, the only problem you might face is if the old bolts are stuck; which is particularly common with extra old toilets. The problem is usually that grime or rust is holding down the bolts. WD-40 will do the trick.
If that is the case, simply spray WD-40 on the fasteners then try extracting the bolts after ten minutes.
Try positioning the wrench on the nut and with the use of your other hand, turn the screwdriver around if the bolts are still stuck. For extreme cases, you might have to use a hacksaw on them. To do this, place the blade underneath the toilet bowl and cut through the bolt in gentle back and forth motions.
At this point, they should be loose enough for you to be able to lift the bolts from the toilet bowl and easily remove the seat and its hinges. Next, just discard these old items into the trash.
STEP 5: Take Out the New Toilet Seat
When taking out the new seat from its packaging, you will notice that it comes with a new set of pre-attached hinges, bolts, nuts and/or plastic covers.
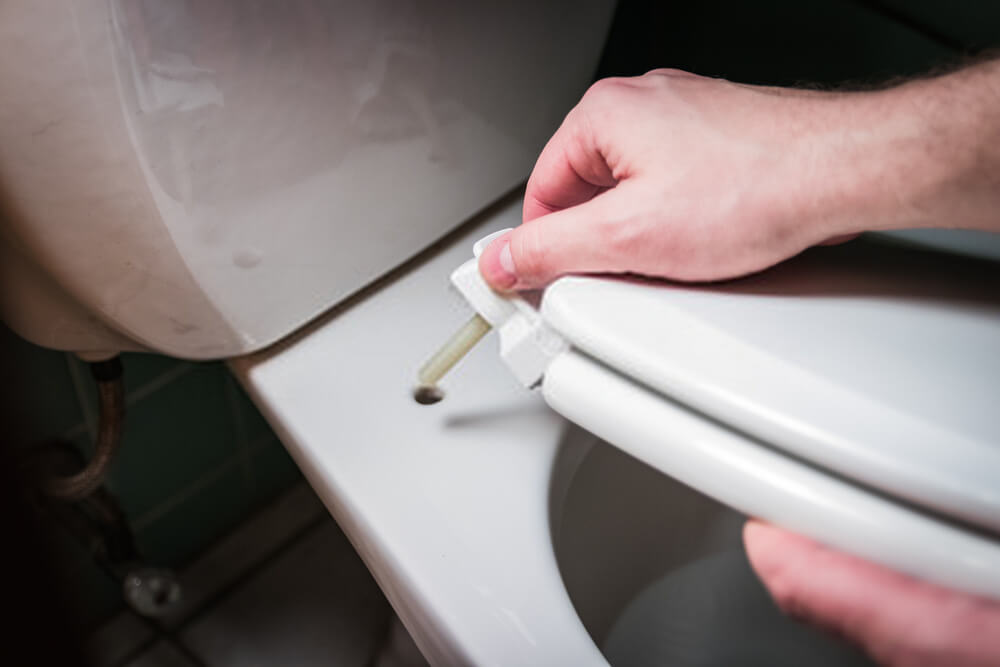
Prepare to install the new toilet seat by first locating the bolt holes and putting the bolt holes in place. The correct positioning is ensuring that the head is at the top in order for it to not fall through.
STEP 6: Fix the Nuts Into the Bolts
Screw nuts over the bolts that are now sticking through the toilet bowl but contrary to the earlier motion, you will now be doing so in a clockwise motion. You can use your hands but at the end you will have to instill the wrench in order to ensure that the nuts are appropriately tightened.
Move on to the other side of the bowl and repeat the process. If the new seat has washers, then you will have to fix them before adding on the nuts. And if they come with plastic caps, place them over the bolt and push them firmly into place.
For some models, you will not have to push the bolts through any hinges in order to attach the seat on the bowl. For such cases, you will simply have to drop the bolt into the holes on either side of the bowl then screw in the nuts. Thereafter, the hinges will glide over the bolt heads.
Be sure to consult the seat’s manual to be extra sure.
Conclusion
Replacing a toilet seat isn’t a task that its too complicated to do on your own. Regardless of the reason for your change, the process is pretty much the same.
Measure the dimensions of the old seat and base the replacement seat’s dimensions off of this measurement. Choose a similar seat style and color and get to working.
Note that the tools required are easily available in any household so that shouldn’t be a problem as well. All you will have to do is unbolt the old seat and install the new one in its place using the tools that come with it.
So there you have it; no need to ring up your plumber for help!
Comments